All posts by Sarah @ 702 Park Project

One Room Challenge Favorites – Fall 2014

Twice a year, Linda from Calling It Home hosts the very popular One Room Challenge, in which design bloggers makeover a room (from start to finish) in just 6 short weeks.  The makeover can be on a large scale, like gutting a kitchen, or a little smaller, like wallpapering a powder room.  Each designer picks his or her own space and shares the process with us.

One of the best things about the One Room Challenge is that YOU can participate too!  Each week of the Challenge, Linda hosts a link up for other readers, bloggers, and designers to share their progress on a room of their choosing.  (Maybe next year I’ll join in…I’m thinking the master closet or laundry room could already use a makeover!)

Last Wednesday, the 20 designers shared the final reveals of their rooms, and everyone is still picking their jaws up off the floor.  This challenge just gets better and better each time! And now, my favorites…

1. Design Manifest – Kitchen

702pp - ORC - DM1 702pp - ORC - DM2 702pp - ORC - DM3 702pp - ORC - DM4 702pp - ORC - DM5

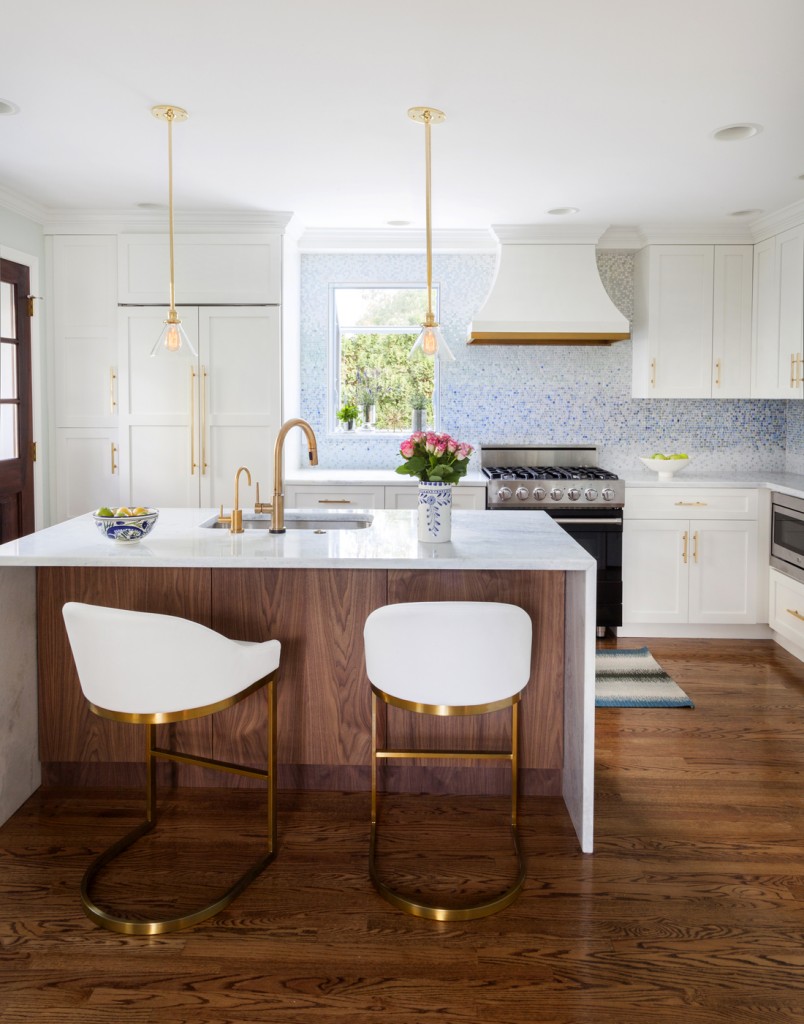
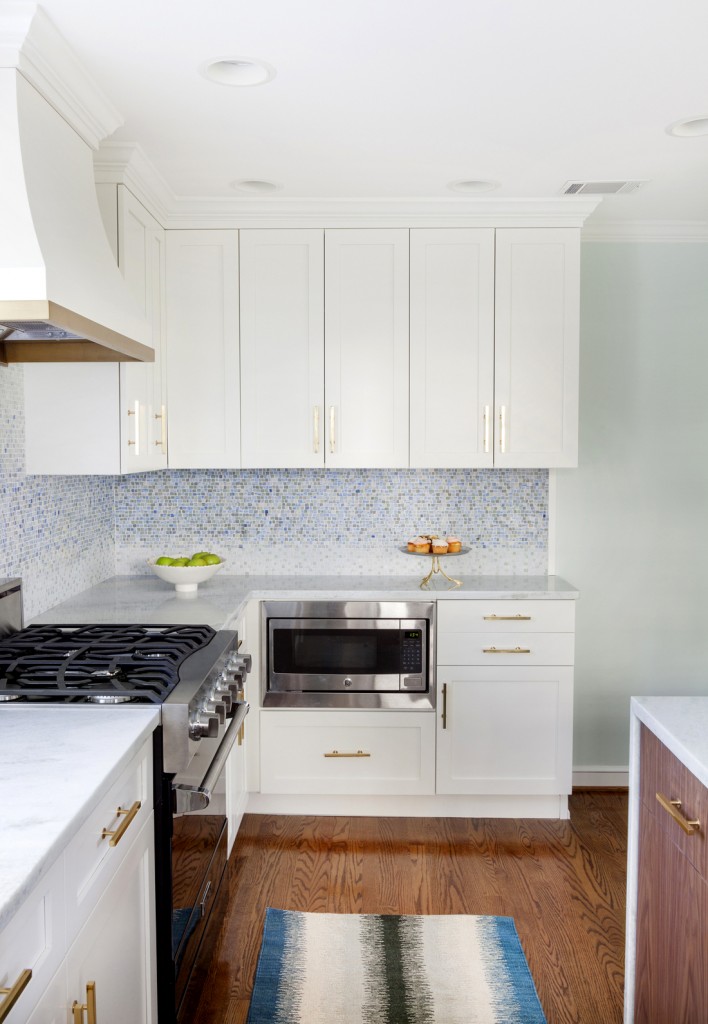
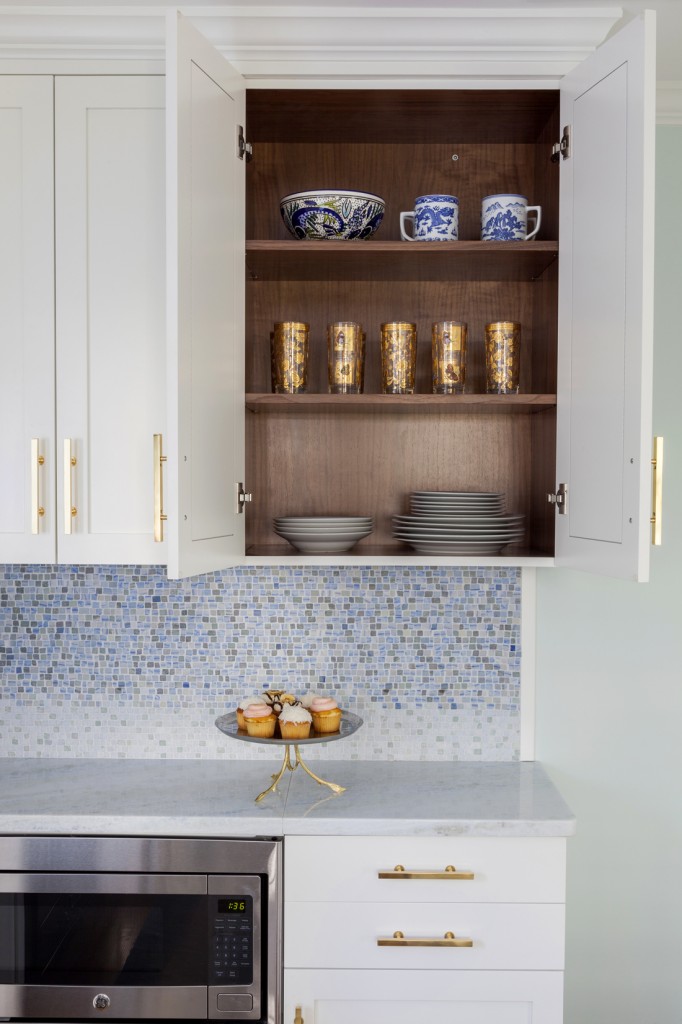
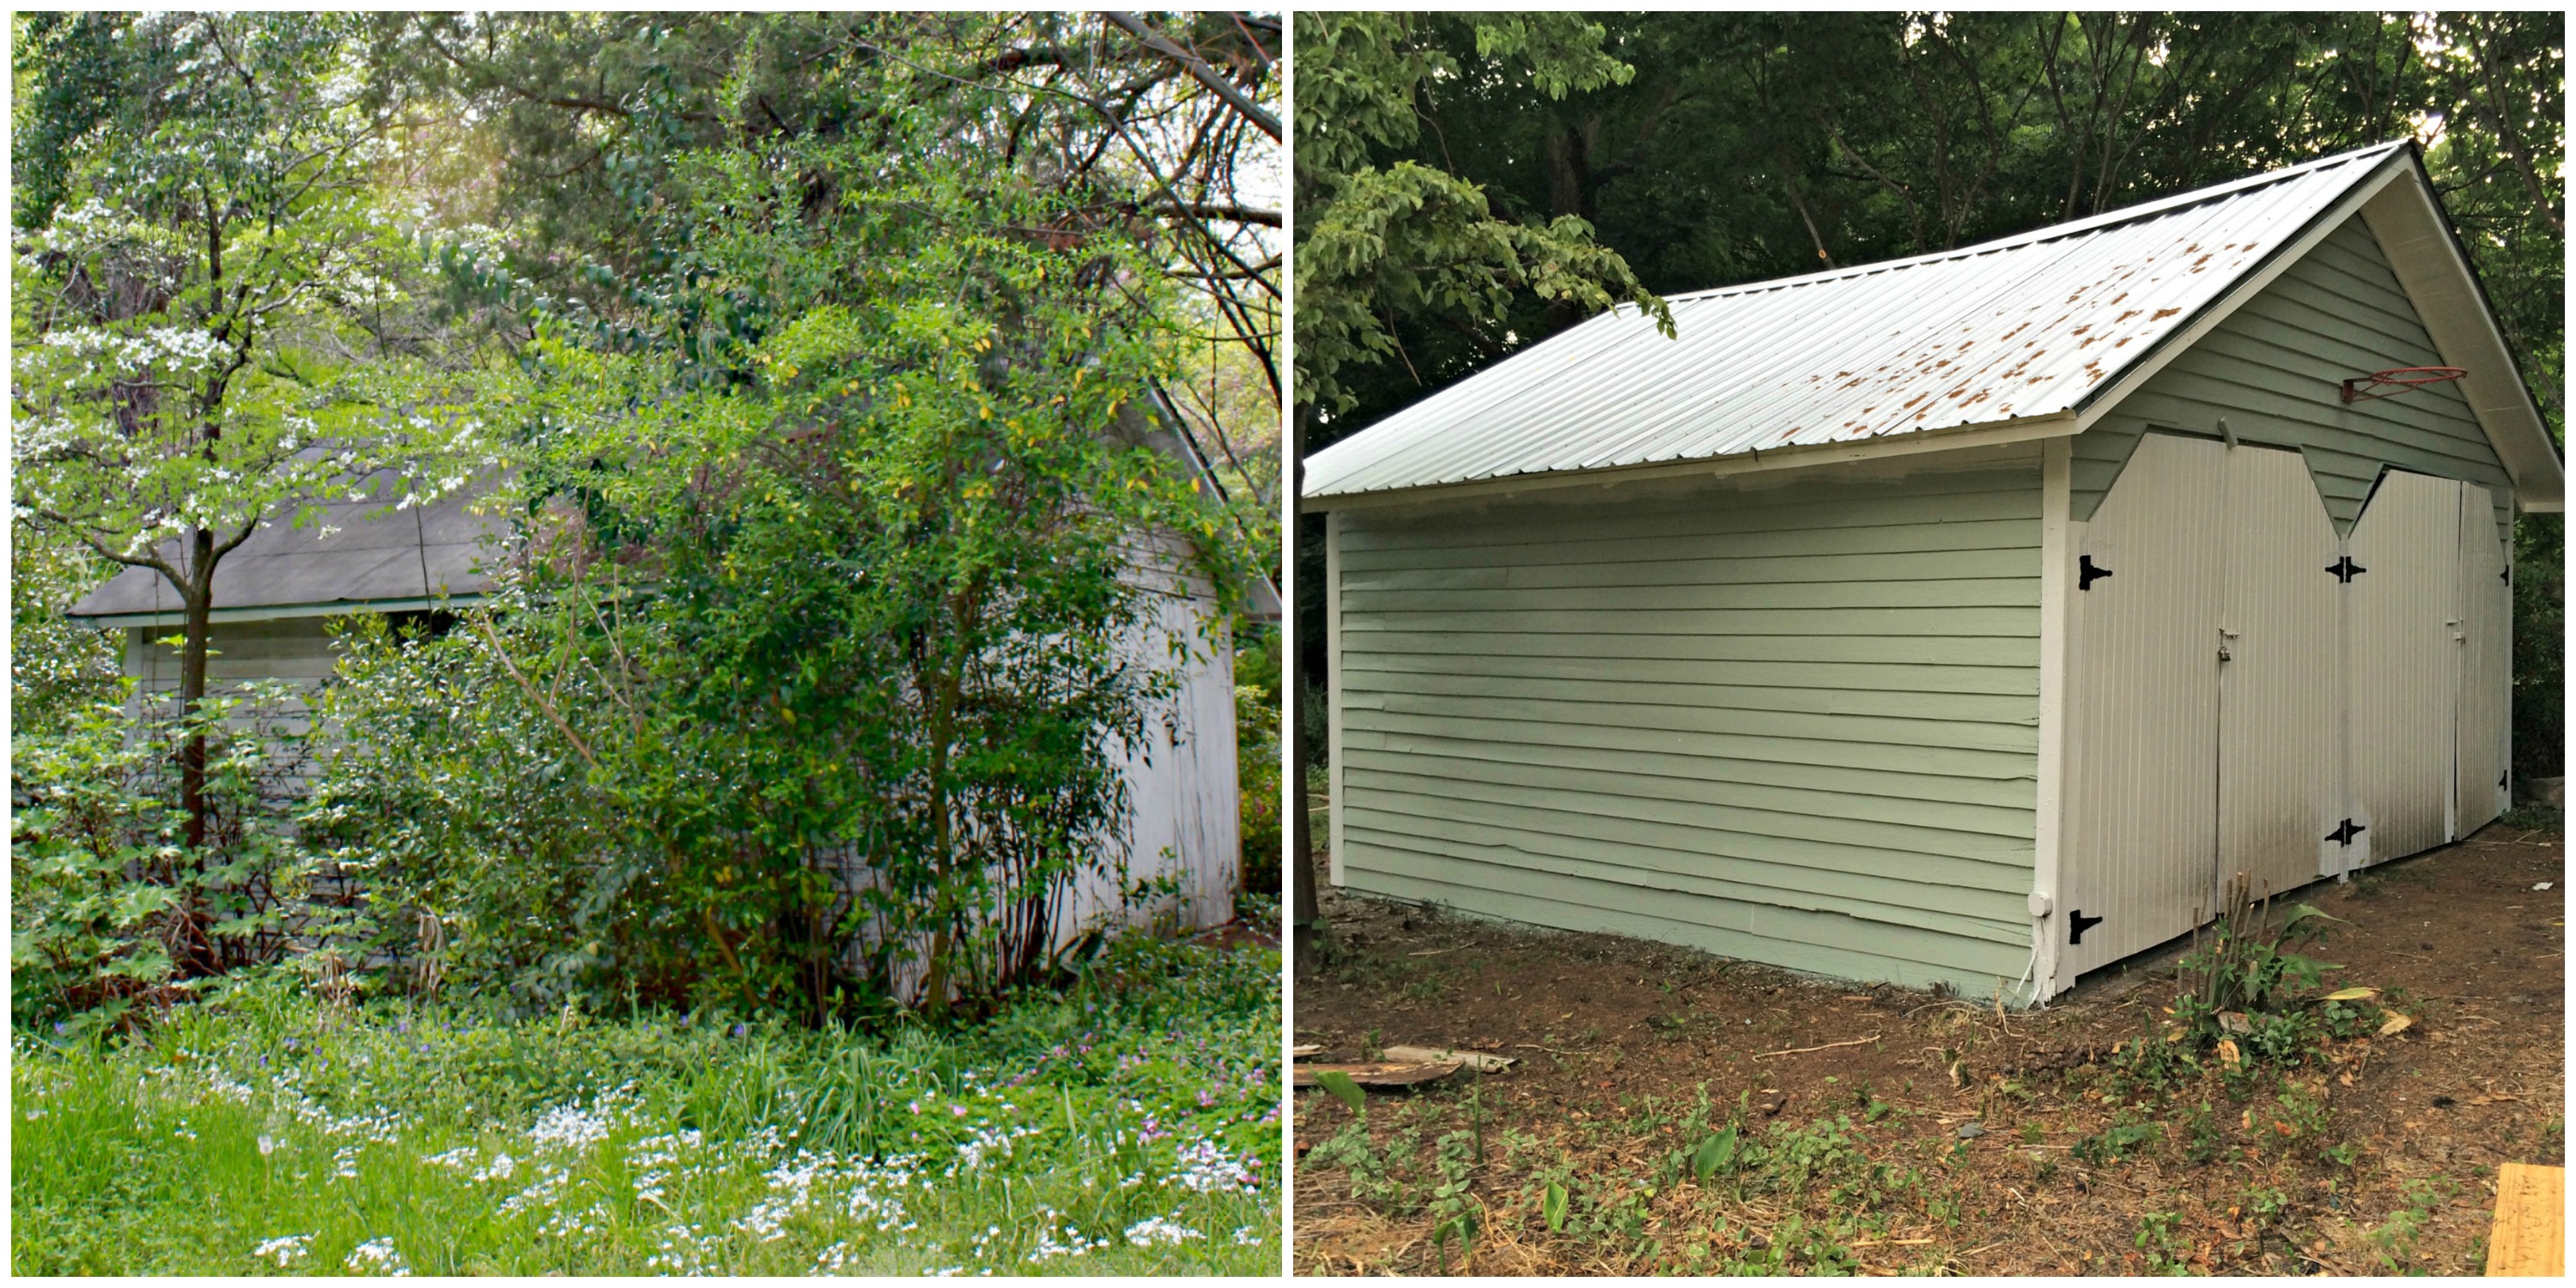
This father-daughter duo knocked it out of the park!  If the rest of the room was terrible, I could get lost in that quartzite waterfall countertop and not even care.  Luckily, the rest of the room is stunning as well! This really was a huge transformation…take a look at the before shots!

2. Mimosa Lane – Walk In Closet

702pp - ORC - ML1 702pp - ORC - ML2 702pp - ORC - ML3 702pp - ORC - ML4

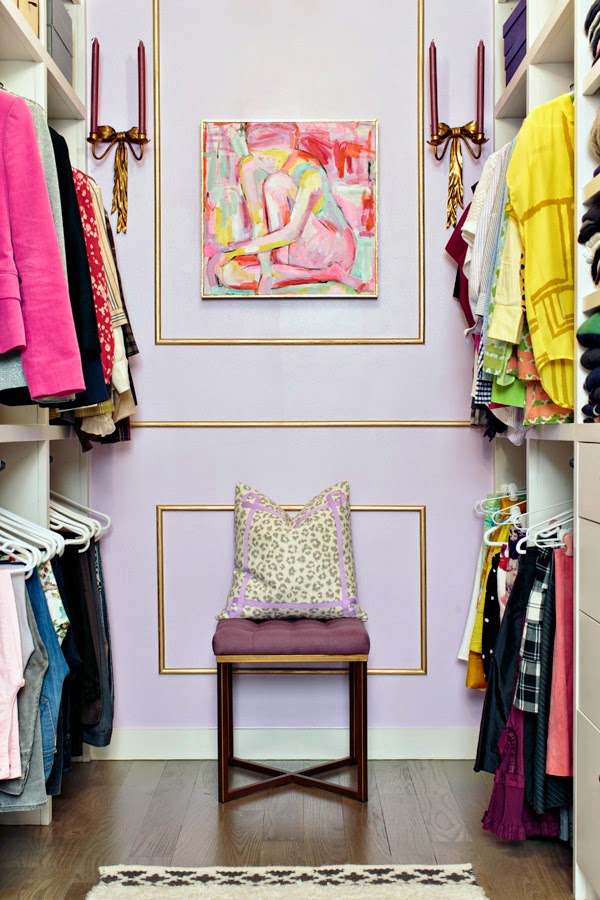
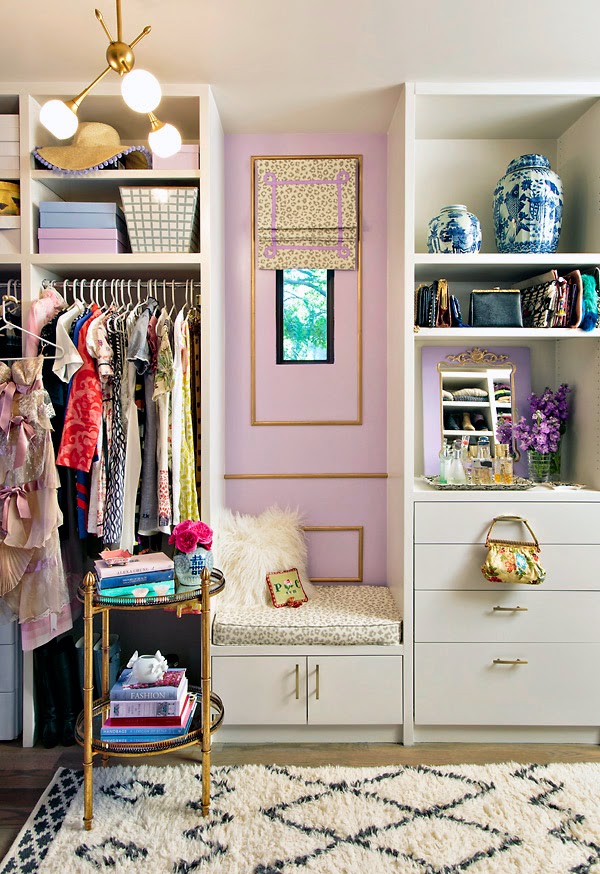
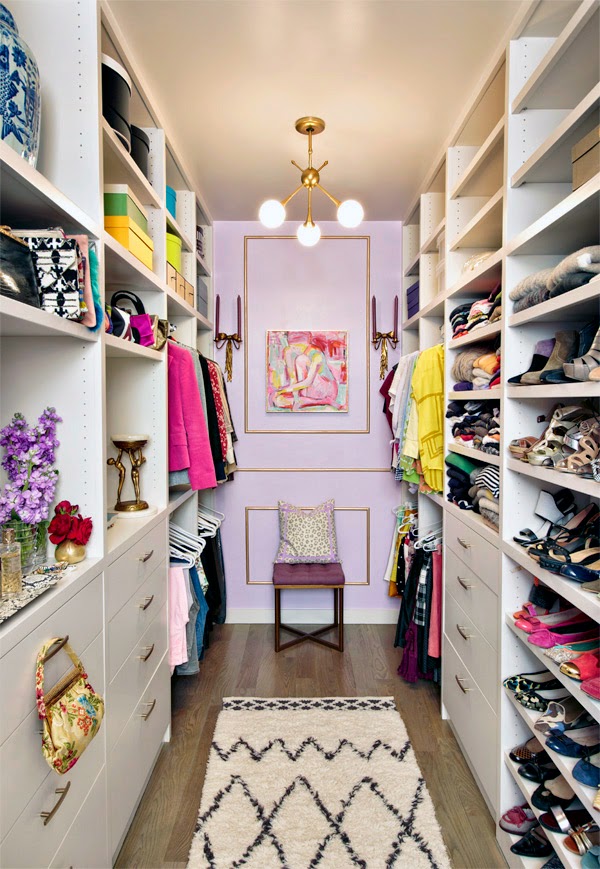
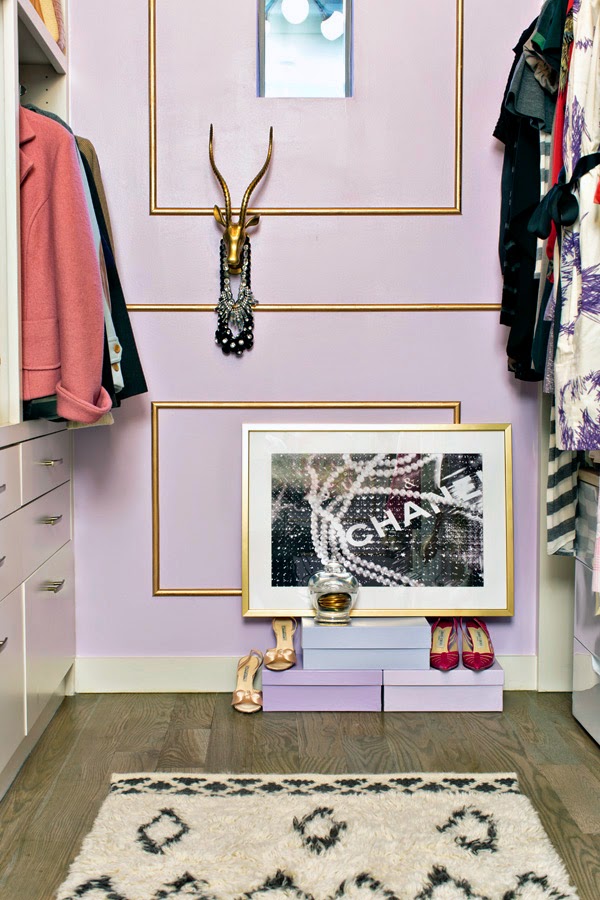
The closet of my dreams! Albertina is the queen of styling, and her room reveals never disappoint.  Her family room last year was definitely at the top of my list! I love how feminine yet functional this closet is. The gold molding, the light fixture, the rug…it all comes together so perfectly.

3. The Design Daredevil – Master Bedroom

702pp - ORC - TDD1 702pp - ORC - TDD2 702pp - ORC - TDD3   702pp - ORC - TDD5

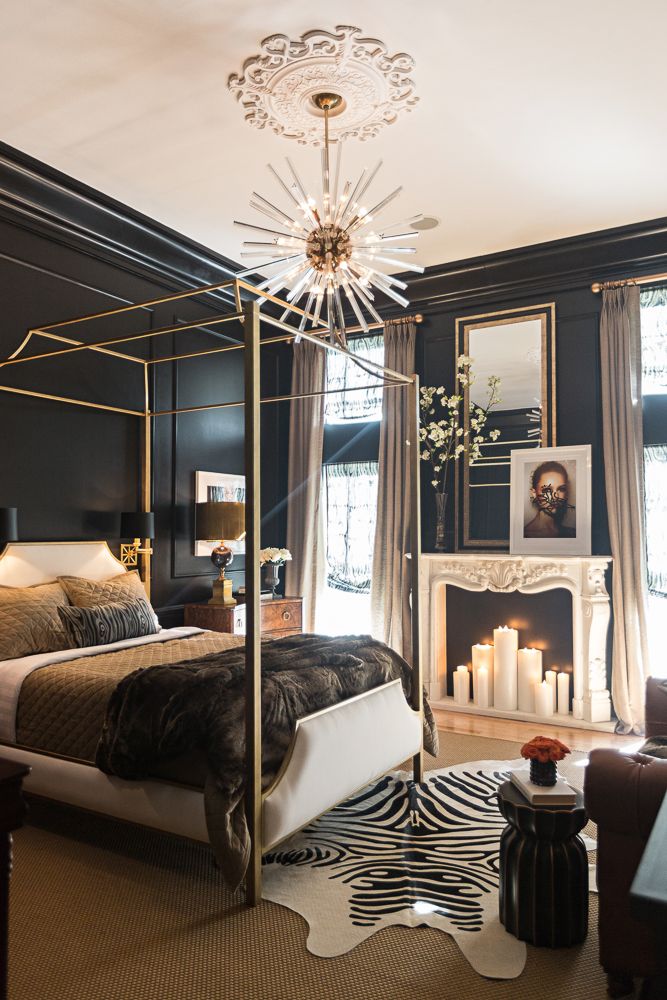
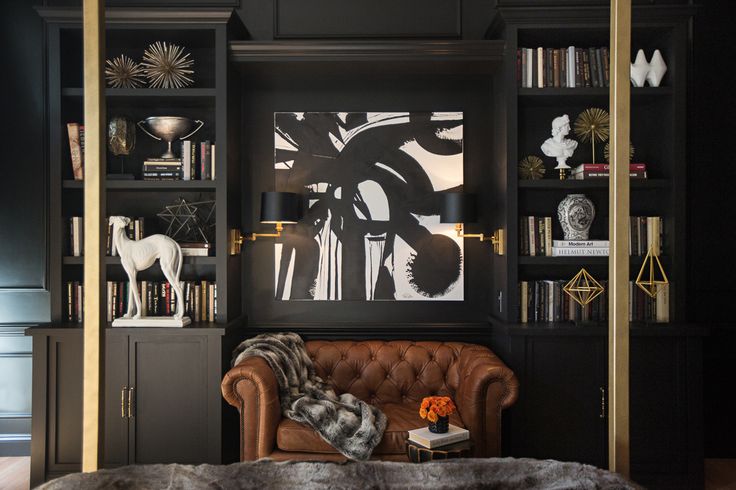
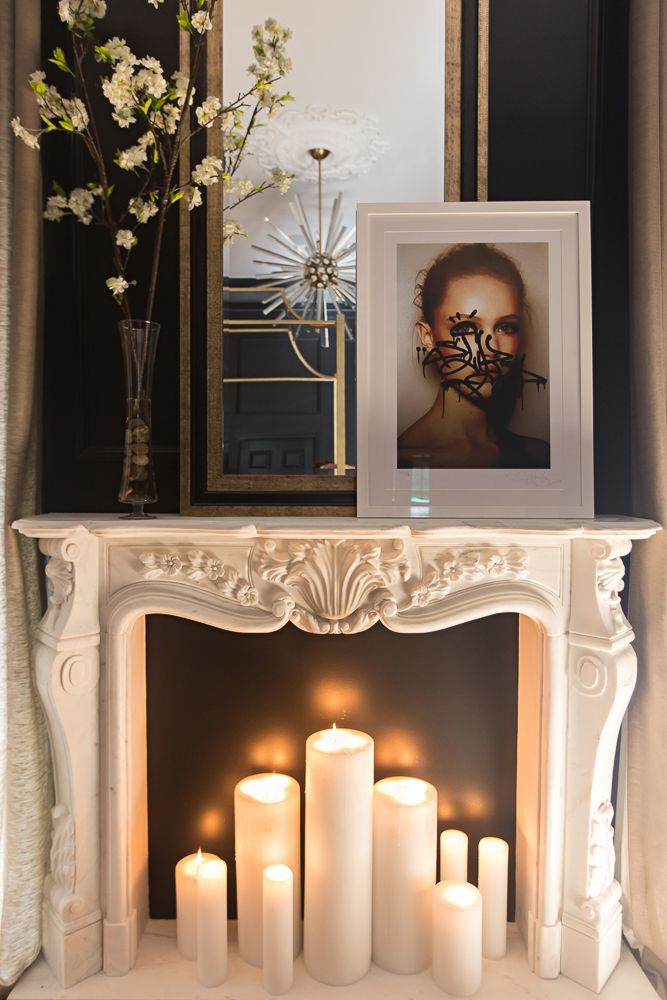
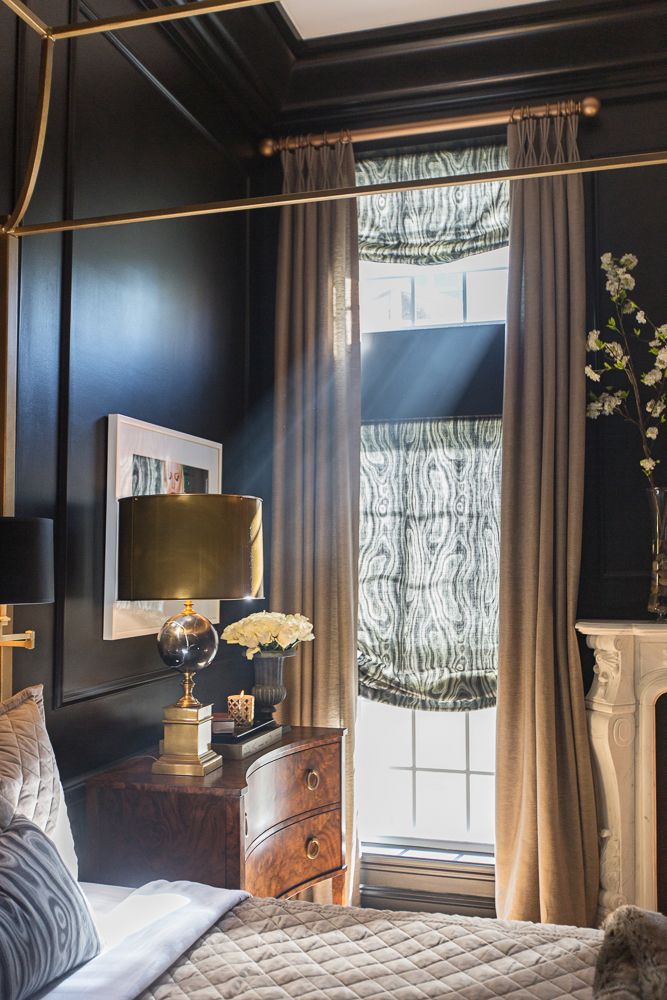
If you want drama, this is your room! This room is so edgy, yet so inviting. I can’t get over the moldings or the built ins, and that chandelier.  I can’t even.  Every single piece in this room seems to play an important part in pulling it all together.

4. The Pink Pagoda – Foyer

702pp - ORC - TPP2 702pp - ORC - TPP1 702pp - ORC - TPP3

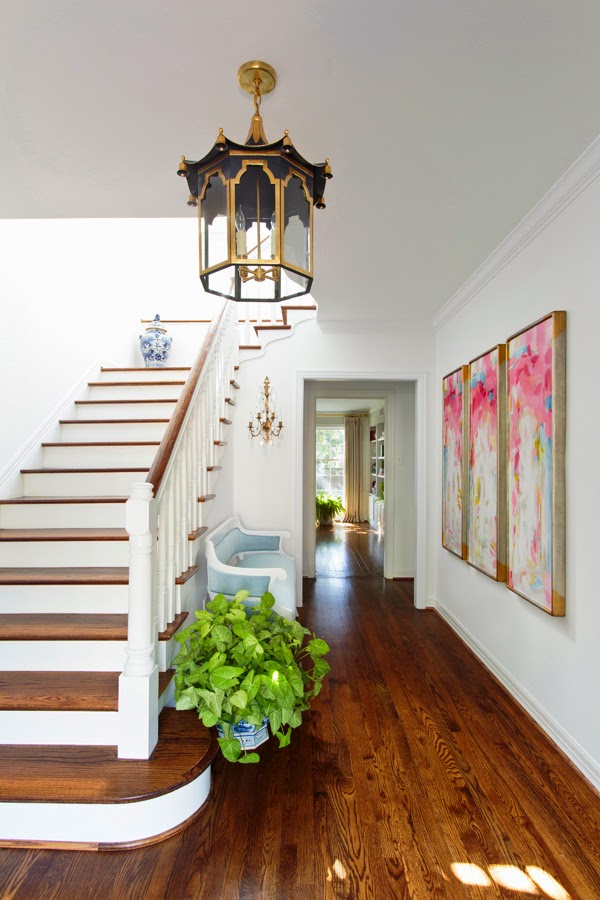
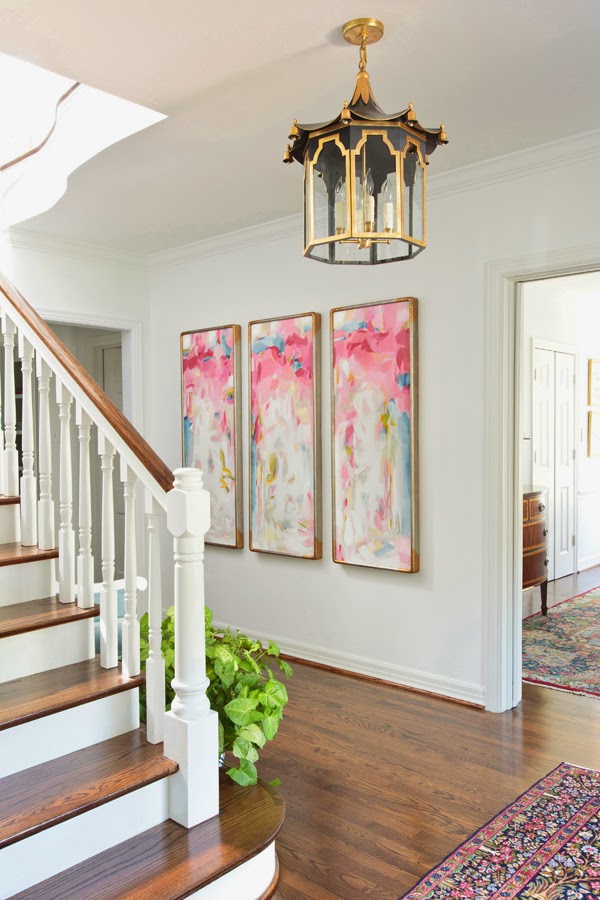
I love this foyer makeover because it’s so achievable.  Some of the makeovers featured are gorgeous, but I know they would never work in my home. I feel like this foyer could be transplanted to just about any home and it would work.  Simple, sophisticated, and timeless. Oh, and I’m drooling over the new lantern.

5. Waiting On Martha – Home Office

702pp - ORC - WOM1 702pp - ORC - WOM2 702pp - ORC - WOM3 702pp - ORC - WOM4

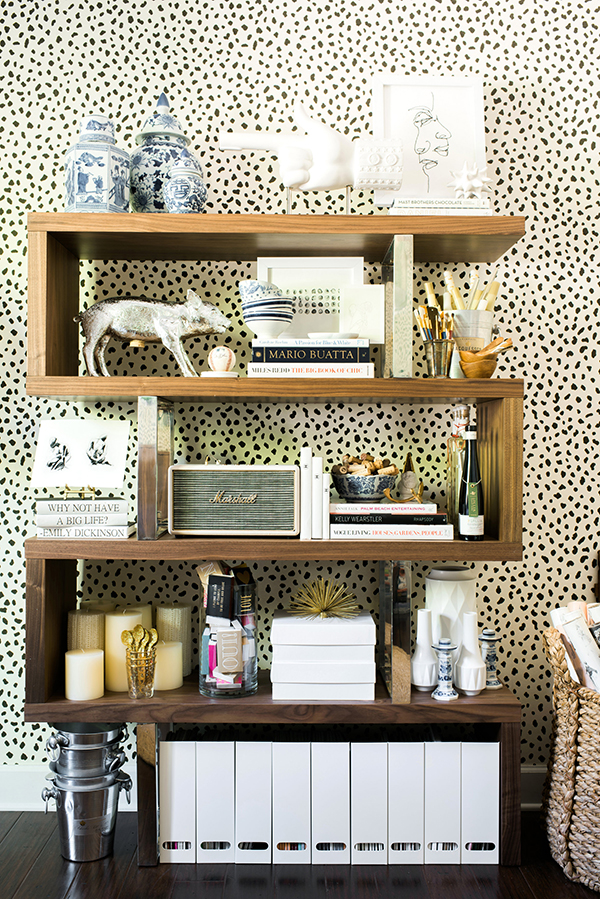
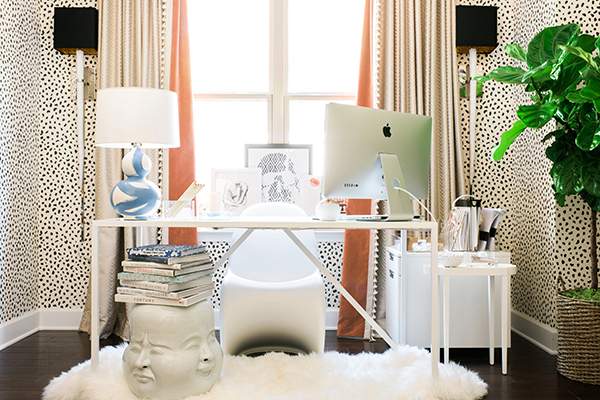
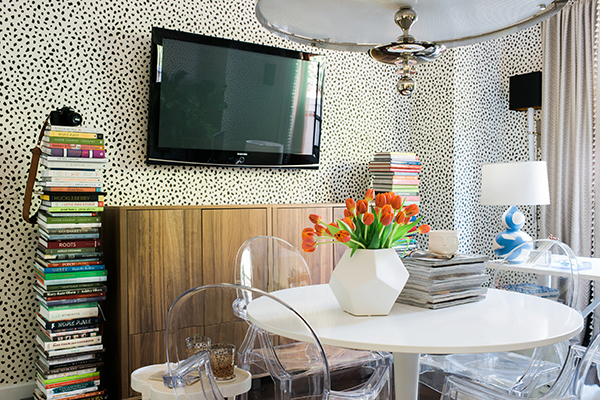
How can you not be in love with this wallpaper?! Mandy started out with this wallpaper, but her furniture was dark and heavy.  I love how she’s lightened up the space with white furniture, ghost chairs, rugs and textiles.

Be sure to check out all of the rooms from start to finish.  These designers really are so so talented.

Which room was your favorite?  If you could give a room in your house a makeover, what room would it be?

PS- you can see my favorites from the Spring 2014 edition here!

This Week’s Links

Happy Sunday! Here are a few links to get you through the rest of your weekend…

I’m seriously obsessed with this living room reveal. It’s so gorgeous!

I want all of these.

The magic of Christmas…at Target. This one’s too funny (and true) to miss!

702parkproject - TWL - targetthedailytay

One photographer documents the death of real-life conversation.

Have y’all been following the Be Our Guest blog hop? This Thanksgiving tablescape is one of my very favorites.

My desktop is now sporting this lovely wallpaper.

702parkproject - TWL - nov

The One Room Challenge designers revealed their fabulous rooms last week.  Which was your favorite? (PS- I’ll be rounding up my favorites here tomorrow!)

How to make your guests feel welcome.

Check out these charming homes of literary greats.

702parkproject - TWL - AD lit

This wallpaper. I need it.

I’ve decided I want everything in Ann Mashburn‘s collection. I don’t hate those interiors either.

25 questions for Bunny Williams.

And in case you missed it…

  1. Interview With The Designer: Ginger Brewton Interiors
  2. The Garage Gets a Makeover
  3. Our Garage Plan in Phases
  4. Renovation Lessons
  5. Feature Friday

I’m also sharing something I’m thankful for each day on Instagram and Facebook, using #30ThankfulDays2014.  Feel free to join in!

Feature Friday

It must be Feature Friday around here, because this little blog is being featured on two fabulous networks today!

First, I’m very excited to be featured on the new NC Blogger Network today! This group of ladies is so talented and I’m glad to have found this local online community.  If you’re a blogger in NC and are interested in joining the group, just click here.

702 profile pic

I’m also featured over at The SITS Girls today.  These girls have been making blogging easier for us since 2008 with their tips, guidance, and sense of community.  You can join The SITS Girls to — just click here!

So hop on over to learn a little bit more about me and why I blog. You just might learn something new! ;)

Renovation Lessons

A couple of weeks ago, a reader emailed me to ask what advice I had about diving into a sizable home restoration project.  It got me thinking, and I couldn’t help but land on this post from back in May.

We had just celebrated a year of home-ownership, and a year of work on the house, so my thoughts and ideas seemed so much fresher and more relevant than they do now.  Well, just in case anyone else has the same question….here’s that updated post for you, front and center.

IMG_6016

————————

You may remember this post from the 10 month mark of our restoration.  As with most things, this process has certainly been a learning experience, and I think it’s safe to say we are still learning!

IMG_5389

Since we hit the one year mark on Saturday, and we closed on our house about 10 days ago, I wanted to add a couple more lessons that I’ve learned.  Here goes…

1.  Always get a clear and detailed contract in writing.  Always.  Because our contractor is also a family friend, we let this one slide.  Big mistake.  ALWAYS get it in writing, even if it means going with someone else.

2. It WILL take longer and cost more than you planned.  Enough said. Our “4-month renovation” took over a year.

 3. Choose your priorities.  Your budget will never go as far as you think (see #1).  In our house, we chose to have a few rooms professionally painted, but only the trim was done in the other rooms.  We painted those rooms ourselves, and saved a lot of money.  We also plan to paint the porches and foundation ourselves, and re-tar the roof to the front porch, among other things.  On a project our size, you can’t DIY everything, but you can find ways to cut corners.

4. Compromise is unavoidable.  But if you have to compromise, compromise on aesthetics.  Never compromise on the structural things that make your house safe and functional.  Stabilizing the electrical, fixing the plumbing, installing new air ducts…these things matter a whole lot more in the long run that my beloved pink couch.  I can’t believe I just said that!

image

5.  Invest in the long term.  We chose to install brand new heating and cooling units that are incredibly efficient.  The cost up front was big, but it will save us money long term.  The brick steps, cheek walls, and master shower were other places that we decided to splurge.  But we think they are totally worth it!  One thing that most people would never know we invested in was our bathroom tile grout.  We chose to go with an epoxy grout instead of the regular grout because it is so much more durable, and virtually stain-proof and water-proof.

6. Take a breath.  Any renovation, whether you’re living in the construction zone or not, will take a toll on your relationship.  That also means, if you’re lucky, that you will come out on the other side stronger than ever.  Just remember to breathe.  You’re in this together.

7. Measure twice, cut once.  Ok, my dad taught me this a long time ago, but it’s so true.  Always double check.

8. Reduce, reuse, recycle.  I can’t tell you how much money we have saved by reusing old wood and bricks.  We’ve also reused old doors and moldings, and were even able to relocate the oversized office bathroom tub to our master bathroom.  These really keep our home streamlined, and saves us a lot of money!

9. Think ahead.  I’m not saying you have to make your house wheelchair accessible, but you should think ahead to future obstacles.  For us, we decided to leave the downstairs bathroom a full bath so that our parents can stay downstairs comfortably when they get older, or one of us if we have a surgery or injury that prevents us from climbing the stairs.  We decided to add the tub to the upstairs guest bathroom instead of just a shower so that we have a place to “wash our babies” one day (as my mom likes to say).

10. Blog about it! You don’t actually have to start a blog, but be sure to at least keep a journal and take lots of pictures throughout the process.  You’ll be sad you didn’t later on. One day, hopefully many years from now, when I’m frustrated over something about our house, I can look back and see how much time, money, energy, blood, sweat, tears, and love we poured into it and remember the reasons why.

IMG_5777

11. Even when you think you’re finished, you’re not.  We’ve been “officially” living in the house for about a month 6 months now, and we are still constantly finding things that need to be fixed or changed.  (Uhh…how did we forget to add a vent in our new master closet?!)  It’s a never-ending process.  I think this may be worse with an old home, but it’s probably true to some degree no matter the age.

12. Throw your plans and your time table out the window.  I had hoped to have an open house/housewarming party in March, then April, then May.  Now I’m shooting for the fall! The planner in me has had to learn to just let that go. It will be fun when it happens! (Update: it happened in August and it was fabulous!)

And one to grow on….get a ROOMBA!!

image1

For Charles’ 30th birthday in May, he wanted the most romantic gift from his loving wife: a Roomba! So it came early and he is completely in love. I often catch him just standing in the corner watching it work.  He’s even named it (Rowdy the Roomba) and calls himself a “Roomba parent.” It’s pretty sweet.  And I have to admit…that thing is freaking awesome! I would totally recommend it!!

What lessons have you learned in your home? What would you do differently?

Our Garage Plan in Phases

Yesterday I shared the transformation of our garage so far.  What did you think?

702pp - garage b&a1 702pp - garage b&a2

I’m pretty happy with how far it’s come, but there’s still a long way to go.  First of all, the white paint job on the doors needs a refresher to say the least.  And that basketball hoop?  It has got to go!

We basically have 3 phases planned for this garage.  You’re looking at Phase 1: square up the garage, clear out the extra brush, slap on a new coat of paint and add a metal roof.

Phase 2: We plan to run electrical to the garage so we can actually use it for more than just daytime storage.  We don’t really plan to park in here until phase 3, so it would be nice to have half serve as a work shop for Charles’ random manly things, and half to serve as a studio and storage for my shop and DIY projects.  We’ll also replace the basketball goal with a new industrial style light, kind of like this.

The main goal of phase 2: make it functional!  Here’s a little inspiration for Phase 2. (Click on the photo for source.)

702parkproject - BHG garage 702parkproject - pin garage 702parkproject - MS garage 702parkproject - OMF garage

Phase 3: Here we’ll concentrate on the outside appearance, as well as making parking a feasible option.  First, we’ll install mechanical doors.  Then we’ll add some character to the outside with a pergola and a brick driveway.  Eventually, we’d like a brick driveway to tie into a brick patio in the back of our house.

The main goal of phase 3: make it pretty!  Here’s a little inspiration for Phase 3. (Click on the photo for source.)

702parkproject - CIT garage 702parkproject - NTS garage 702parkproject - pin3 garage 702parkproject - pin2 garage

That last one is my dream garage.  The charming brick driveway with the perfectly manicured grass….I’m obsessed!!  You can see all of my garage inspiration here.

So that’s the plan.  The timeline is a whole different story….right now we’re just taking it one project at a time.

What’s on your project list these days? Have you ever tackled a garage renovation? What are your best tips?