
If you live anywhere on the east coast, you know we’ve been having a bit of a winter wonderland these last few weeks. It’s very rare for us here in North Carolina, and as all the jokes go, we pretty much shut down.
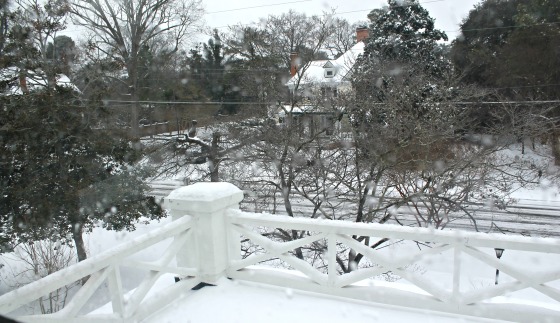
Luckily, our plumber didn’t shut down. He braved the storm to come finish installing our second guest bathroom fixtures. Let me refresh your memory…

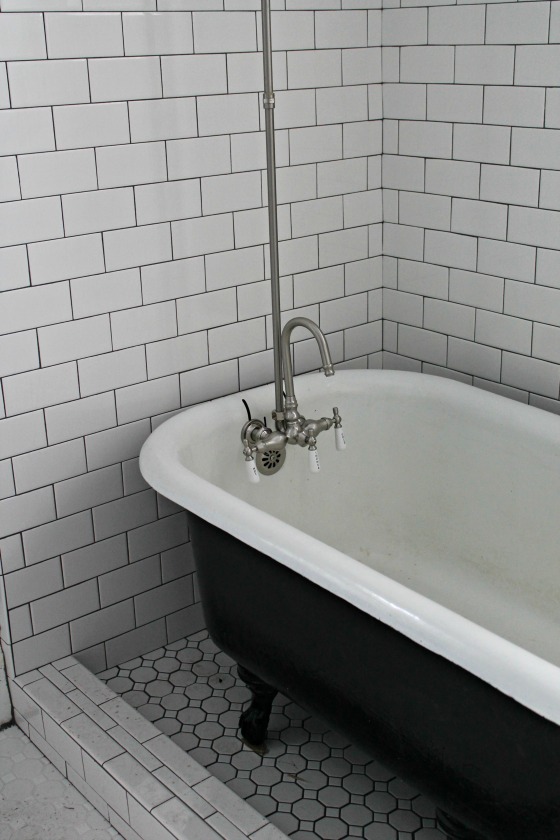
When we bought the house, the bathroom was configured in the most nonsensical way. There was an exterior door (for no apparent reason), the tub butted right up to the tiny corner sink, and the toilet was in a separate room.
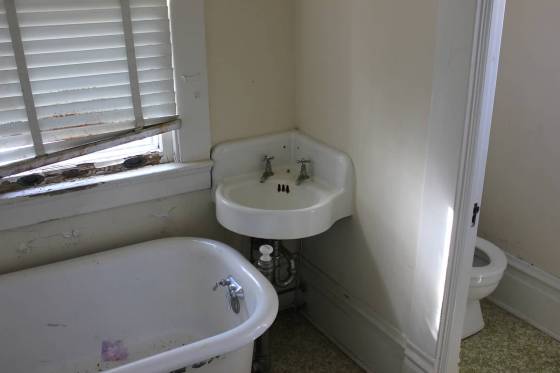
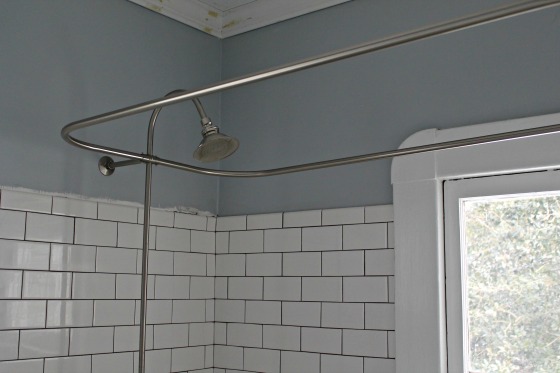
So we ripped everything out and basically started from scratch. We tore down the wall separating the toilet, we removed all the fixtures, and we sealed up the exterior door. And as of yesterday, the shower/tub is FINISHED!!
Sorry there aren’t better pictures. The room is about 5′ x 8′ which makes snapping full shots rather difficult. Anyway…
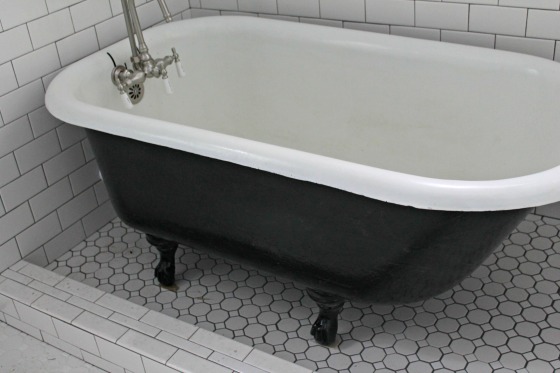
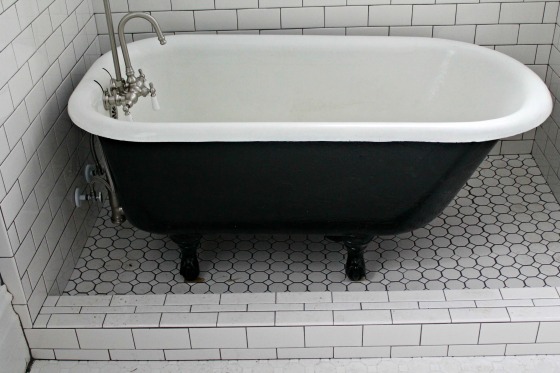
We went with a white grout on the main bathroom floor, then a dark gray on the shower floor and walls. I love the way the difference makes the shower area look complete.
Of course it’s not finished yet. The tile and tub still both need a lot of cleaning, and we’ll have to scrape off a bit of paint that dripped into the inside of the tub. And we’ll need a shower curtain. But I was just so excited that I couldn’t wait to show y’all!! It really turned out even better than I expected.
This bathroom was the last thing that needed to be completed before we moved in. Now….it’s on! :)
Sources:
Floor tile- American Olean Sausalito mosaic tile
Wall tile- American Olean subway tile
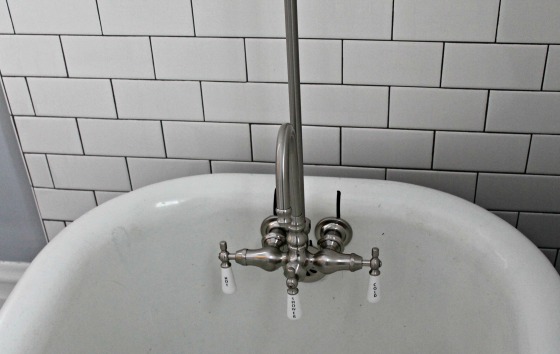
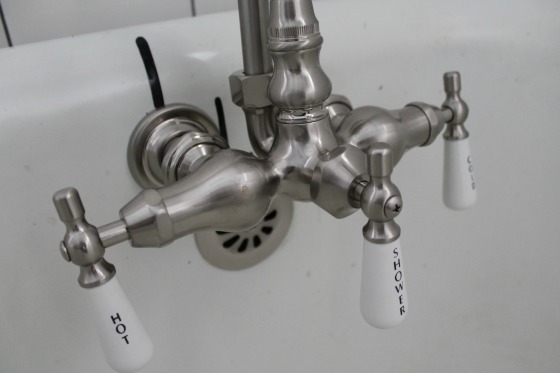
Tub hardware- Signature Hardware
Tub paint- Rustoleum High Gloss Black
Wall paint- Sherwin Williams Lazy Gray
very nice!!!
Thanks, Sharon! :)
It’s just lovely. You are so lucky to have an outside window for your tub/shower. There is nothing like having the morning sun shining on you while you shower or watching the critters at play while you take a relaxing bath. Your house guests are in for quite a treat.
Maralyn, I can’t wait to take a nice bath in there! Luckily we will get to try it out while we wait for our master bathroom to be finished.
love it!! How exciting. It looks beautiful! Now to the hard decisions, what shower curtain will you hang here?
I know!! That is definitely the hardest part! I’ve got this old curtain from Target to use until I find something that’s just perfect. http://www.pinterest.com/pin/63261569739904986/
Oh my! I think you just created the bathroom that I want to install in our Dream House!
Thanks! We still have lots to do, but it’s getting there! :)
That tub makes my heart sing. I just love, love, love. I can’t wait to see what you do with the rest of the room.
I love what you did with the slightly elevated area around the tub. I currently have a small shower stall but am planning the big renovation with exactly this concept in mind. What size is your clawfoot tub? Thanks for sharing!!
Hi Dew! Thanks for stopping by! Our clawfoot is considered a “baby” clawfoot and is exactly 4 feet long. It was the perfect size for our space. I would also highly recommend sloping the floor under the tub slightly and adding a center drain. We love ours!
Wow Sarah, gorgeous job on your bathroom makeover. I can’t believe the sink butted up to the tub like that and the toilet shoved in a tiny enclosed area. You’ve opened up the space and made this room so much more functional. Love it! I’m visiting from the Monday Funday Party!
Thanks so much, Marie! I just discovered the link party today and am loving catching up on everyone’s projects. :)
Hiya – this looks GREAT! Question for you – when you did your tub, did you repaint both inside and out or what was your process there? Anything special to seal it? We’ve got a 1920’s tub (or two) that both need to be refinished and I was wondering how you were doing it?
Thanks!
Shannon
Hi Shannon! We actually refurbished 2 tubs from the 1920s…one black and one white. We only painted the outside. The inside just got a good cleaning. It was actually pretty simple. Here’s the full tutorial: https://www.the702parkproject.com/2014/01/28/how-to-paint-an-iron-clawfoot-tub/
I would highly recommend that you use a pumice stone to sand down the outside before you try to prime. It will make your life a lot easier! I’d love to see yours when you finish! :)
Thank you so much! Here’s what it looks like now (not ok.) http://i1.wp.com/www.111orchard.com/wp-content/uploads/2014/04/Tub.jpg It makes me sad. LOL That’s in the master. It’s a cool sleek tub, but it just needs major rehab. It looks like someone has tried to paint it in the past without doing it correctly. So…I want to fix it.
Anyway, thanks so much for your help!!
Oh wow! I can’t wait to see it finished! Good luck! :)
Wow! You really had vision when you bought your house… Oh my! That looks like it was a LOT of work! But look at how amazing it turned out! I hope you totally and completely love it and enjoy it every day…. :)
“hugs” Crystelle
Crystelle Boutique
I love that tub! We have been thinking of doing a tub like that in our old bathroom – it is an old marble tub that is over 30 years old and quite shallow. It is in really good shape considering its age though so we haven’t gotten around to ripping it out yet.
Thanks for stopping by, Kimberlee! I’d love to see the tub if you refinish it…it sounds awesome! :)
So cute! Pinned! Thanks for stopping by our party. Lou Lou Girls
http://loulougirls.blogspot.com/
Thanks sooooo much for linking your amazing project w/ Twirl and Take a Bow! I have such a soft spot for a claw foot tub and white tiles! I smiled my way through your makeover :) ox
Thanks so much, Robin! I’m glad you enjoyed it! :)
Nicole on Rehab Addict would be so proud of your work (I love that show and what you’re doing with your bathroom). Thanks for sharing on Inspire Us Thursday on Organized 31.
Thanks for having me, Susan! Rehab Addict is one of my favorite shows…love Nicole Curtis!
Oh wow, what a fabulous makeover. I love it all, and the tub is wonderful. Thanks tons for linking to Inspire Me.
I love the subway tiles and the black and white tub. So cute! What a funky bathroom to begin with! Thank you so much for sharing at Redouxinteriors
Thanks for having me, Karen! So glad you enjoyed the post! :)
Congratulations! You’ve been Featured on Wicked Awesome Wednesday!
The tub and tile look GREAT!
I see you’ve already got the I’ve been Featured Button! GREAT WORK!
Thanks so much for the feature! :)
Thank you so much for sharing your creativity on The Inspiration Board at homework. You were featured in the spotlight!
Have a wonderful weekend.
carolyn ~ homework
Thanks for featuring my post, Carolyn! I enjoy linking up each week! :)
how do you clean under & behind the tub ?
Could you tell me where you got your plumbing fixtures for your tub. We’re redoing our clawfoot tub and love that tub/shower fixture.
It looks great! I’ve never seen a claw foot bathtub enclosed that way in almost a shower enclosure on the floor. What is the thinking behind that, just to keep the spills contained? It’s a great idea. I read your note about sloping that area to a center drain, good tip. I checked out the shower surround link that you posted, I’ve been having a hard time finding one that is affordable. I guess I need to spend $400+ for one, that seems to be the low end of the going rate. Don’t know why they’re so much!
Thanks for the post
This article is very informative. Nice work! Thanks so much for sharing this article.
click here for more information