I’ve posted all of the pictures from the weekend to Shutterfly. Take a look! Stay tuned for updates on what you see!

I’ve posted all of the pictures from the weekend to Shutterfly. Take a look! Stay tuned for updates on what you see!
Man, it’s crazy how a project like this evolves. There were a few weeks there where I would go over and, although I knew plenty was happening, the changes just weren’t all that apparent from day to day. Well I feel like we just took off running because the changes are so visible it’s a little overwhelming!! I just uploaded all of my pictures from this weekend to my computer and got lost in them all over again. So, in order to keep you from feeling as overwhelmed as me, I’ll give it to you in bits and pieces.
Lets start with the bathrooms. Right now, we have three bathrooms in the house (one downstairs, two upstairs), and we’ll eventually have four when we add the en suite. So for now, I just want to fill you in on our plans for two of them: the downstairs bathroom and the upstairs hall bathroom.
The downstairs bathroom–Well, it looks quite different than the last time you saw it. The Sheetrock, flooring, and ceiling have all been removed.


Oh, and we also now have a toilet in our living room. You know, just in case.

Pretty dramatic change, huh? We very quickly learned that the floors in the bathroom are not salvageable. There is evidence of several repaired leaks and lots of plywood patching. Here’s a shot of all the different levels on the floor:

So, we are thinking that we want to just go over the sub-floor again with hardwoods to match the pine in the rest of the house. Our contractor has some beautiful vintage pine that will work perfectly! But there’s one problem. The vanity was built on top of the flooring, so we will either have to rip that out, or cut the flooring off at the vanity (which will require a lot of finagling). Since we know we don’t want to keep that vanity long-term, we decided to go ahead and rip it out and finish the floors.


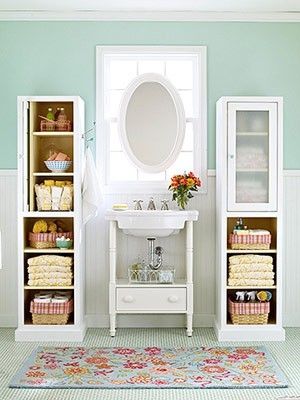
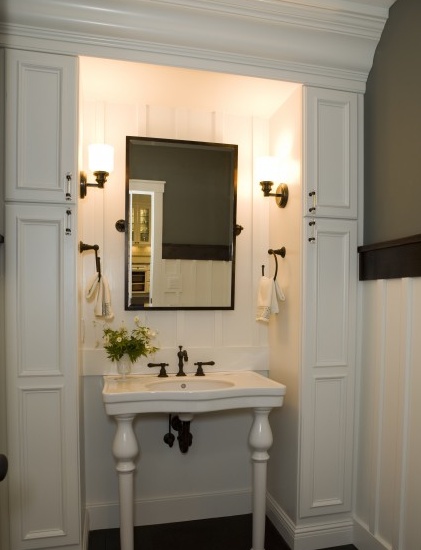
Luckily, our very kind neighbors have offered us a pedestal sink that they no longer need, and we think it could be the perfect piece to go in here. It would tie in well with the other pedestal sink we plan to put in the upstairs guest bathroom. Also, that would allow us some room to build in a little more storage in this bathroom. Maybe something similar to one of these.
We have also decided to leave the green tub, instead of busting it out, for the time being. Although there are no bedrooms on the first floor, it does make sense to have a shower downstairs in case one of us is ever injured and can’t do stairs (or for when my parents are really old, hehe!). But, you know how much I hate that green tub! So we plan to paint the tub white with an epoxy paint. Here is a pretty good run down on what exactly that entails. Our contractor also framed out the window that we uncovered in some old moldings he found at the house. Now it matches all the other windows and doors! Hooray!

The ceiling will be open until they can run the plumbing to the bathroom directly above this one. Hopefully that will be a smooth process!
Next up, and hopefully much simpler, is the upstairs hall bathroom. Remember how excited I was to get that tiny, gross shower out of there?!?! But then it was left in the hallway for a month? Well now it’s officially OUT OF THE HOUSE!! The guys did some cleaning up, and that was the first thing to go. YYYAAAAYYYYY!!!! So now our hallway looks like this:

Beautiful, right? Just ignore the green carpet, missing bathroom floor, and stark white walls.
With the shower out, this is a pretty easy one. Luckily the vinyl was glued down with a pretty nonabrasive substance (unlike the tar used in some areas), so it should come up pretty easily. We have already started that process, and the floors seem to be in good shape. They just need a good sanding and stain, and we’ll be in business.


They also replaced the molding that was removed behind the shower with a scrap from another area. I plan to put my grandmother’s chest in that space for linen storage, so no one will ever know the difference! (Unless, of course, you’re reading my blog.)

Well, that wraps up those two bathrooms. Are you exhausted? I hope not, because we’re just getting started!! Coming up soon…the main guest bathroom, the master suite plans, and new developments with the exterior. Stay tuned! :)
I know I promised a post today on the exterior work being done this week, but as of last night, there are some new developments. Check back Monday for the full story, and lots of great pictures, including a “bird’s eye view” of the roof!

I hope y’all have a fabulous weekend!!
Warning: Please excuse the embarrassing, grainy pictures…iPhone did not like this evening indoor light. A photo round up is coming next week, I promise!
Remember when I asked if we should go with wood or tile floors in the master bathroom?
Well, I think we’ve made up our minds! As of yesterday, we no longer have linoleum in the bathrooms! Let’s take a moment of silence for those hideous floors.
 {via}
{via}
Ok, now that that’s out of the way…the verdict: WOOD!
There’s still tons of glue and gross stuff that we have to work through, but getting a glimpse of these original hardwoods underneath it all totally convinced us.


But it was really the pantry/closet that showed us the potential of the floors.

A good cleaning and a coat or two of stain and those suckers are ready to go!! And according to this interesting article, they are totally salvageable. I think they would look beautiful stained in a rich, dark color. Maybe something like the floors in these:
 {via}
{via}
 {via}
{via}
What do you think? Do you like hardwoods in a bathroom?
Stick around for updates on the exterior tomorrow! Here’s a little sneak peek…

I hope y’all had a fun holiday weekend! Ours was great, other than a little game-day sunburn!! But the Pack won, and we got to go to the beach, so no complaints here! :)

So, back to the house…
As of Friday, the entire interior has received at least one coat of primer! In most places, 2 or 3 coats. And when I say the entire interior, I mean walls, trim, and ceilings. The difference is absolutely amazing!! It doesn’t even look like the same house. Now it is just a huge blank canvas for us to add our touch to.


If you can’t really tell a difference, compare the doors and fireplaces to the walls. The walls used to be the same color.


Pretty incredible, right?
Up next: the roofers are supposed to start this week. After they finish, the carpenters can get back to repairing and replacing the exterior woodwork. The electrician is just about finished with rewiring and installing new outlets. The inside will get a final coat of tinted primer in a few weeks.
Right now I’m working on master bathroom designs. Charles and I went over to the house to get some exact measurements yesterday, so I’m going to play around with a few ideas and try to figure out the best layout for the bathroom. I’ll definitely be sharing our plans with you once we have it nailed down. In the meantime, you can check out some of my favorites on my Pinterest page.
Well, not yet. But we will be soon! The electrician is about half way through the first floor with new outlets and receptacles, and hopes to finish up the rest of the house this week. To stay on trend with the period of the house, we have decided to stick with the antique brass switch plates, but switch the actual outlets to black instead of white. It looks really great, and I can’t wait to see it all put together! Below is a shot of what will be behind the TV stand in the den. We decided to go with 6 outlets total, so hopefully we can avoid ugly, bulky power strips.

Eventually, we are going for something like this:


And while we’re talking about lighting…
You can see my post on front porch lighting options here. I found this very simplistic chandelier at Lowe’s this weekend, and now I can’t get it out of my head.

Am I crazy? Who puts a chandelier on the front porch? Isn’t that a little excessive? But then again, I keep coming back to these photos, and it doesn’t seem so ridiculous.


I mean, THAT is excessive. That makes my idea look incredibly unassuming. Right? Or am I just rationalizing this? Help!