Category Archives: Reno

Five-Month Roundup

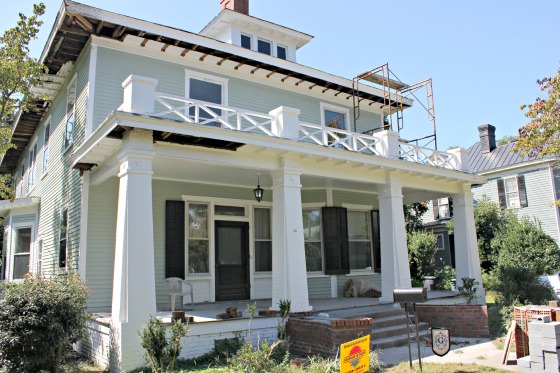
On Sunday, we will be 5 months into construction on the Park Avenue house.  That’s 154 days!!  Today, we’ve been homeowners of this fixer-up (understatement of the year!) for 161 days!  That seems so long ago now.

IMG_2091

Anyhow, here’s the five month round-up!

This is the broad list of things we had left to do as of the end of month three:

  1. Scrape and prep interior walls, trim, and ceilings
  2. Prime and paint interior walls, trim, and ceilings – every room is primed, and 3 rooms are painted!
  3. Remove all interior carpet
  4. Finish electrical, including adding several outlets and wiring each room for ceiling fans – almost finished!
  5. Repair all porches
  6. Patch and paint the metal roof
  7. Rework hidden metal gutter system and repair/replace exterior woodwork – this is a long process, but it’s moving along!
  8. Install new heating and air system
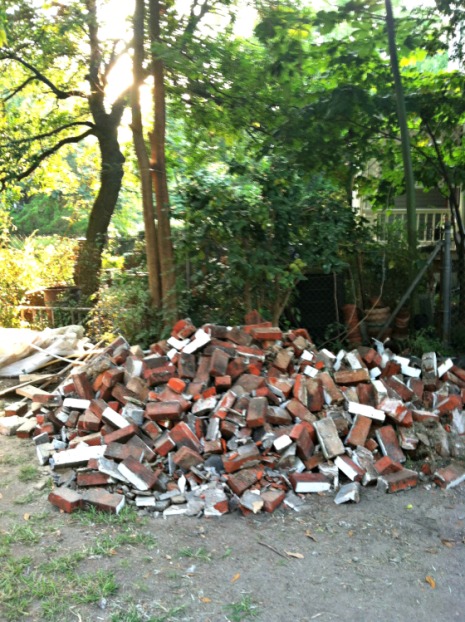
  9. Repair mortar in the basement, and repoint front-of-house mortar
  10. Finish upstairs back bathroom (tile floor, plumbing for a shower, new sink)
  11. Update downstairs bathroom (paint cabinets, new mirror, new light fixture)
  12. Repair garage (it is currently sturdy, but leaning)
  13. More landscaping

I know it doesn’t look like a ton has been done in the last two months, but trust me…it has!

The two back porches are now stable and have gotten new tongue and groove floors.  The entire basement was sealed, and new steps were added.  The gutter and soffit woodwork is progressing.  Unfortunately, the rain we’ve had the last two weeks have slowed that down a bit, but it’s getting there.

WP_20130929_0121

WP_20130929_031

WP_20130929_024

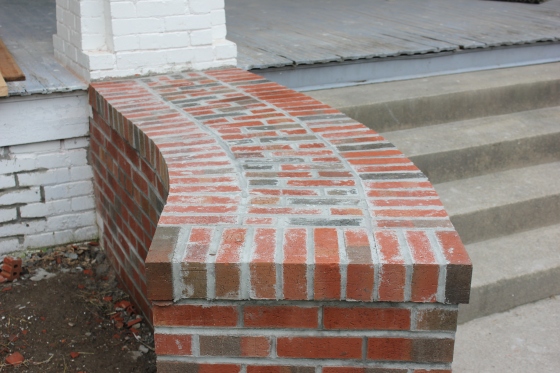
Our mason has finished the front cheek walls, which we’ve decided to leave natural instead of painting.  To continue that theme, we have decided to add a similar cheek wall off of the back porch, and to replace the cement steps with brick steps.  Eventually, we would like to have a brick patio in that area, and we thought this would be a nice transition.

IMG_4102

IMG_4103

Our heating and air system is completely ready to go, but we decided to wait until closer to move-in before installing it.  After the thefts we’ve had, we don’t want to take any chances!  So for now, the system is living inside…

IMG_3963

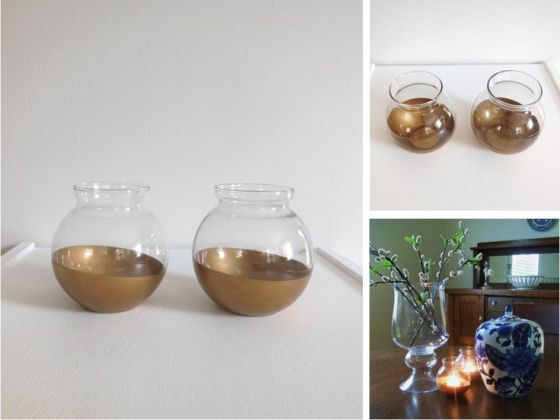
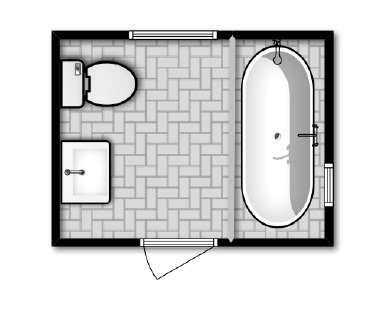
The two guest bathrooms are now empty.  It’s just a blank slate for us to do what we want!  You can see our plans for the upstairs office bathroom here, and the downstairs guest bathroom here.

12157006f25f570891291829b79a7985 {via}

Also, we met with our architect friend on Sunday to discuss plans for the master bathroom.  We decided on the pieces that we want: a large tile and glass shower, a water closet, a tub (we’ll be using the pedestal tub from the office bathroom), and a double vanity.  From there, he’s going to come up with a few layouts that he thinks would work best.  I can’t wait to see!!

I’m hoping to get a new set of pictures for the whole house over the weekend.  Being on crutches kind of prevents me from getting over to the house often, especially the upstairs.  Thanks for your patience…I’ll be back soon with many more updates!

Care to venture a guess on our move-in date? 

Also, don’t forget about our giveaway going on at The Remedy House until Friday at 5 pm!

1b0cafcd2d5f2e567be03a83a018e880

A Peek at the Porch

Remember these sad porches?

13

They’ve been getting a lot of much needed love lately! First, the exterior was painted and the rotted eaves were removed, which gave them an instant face lift.

IMG_4041

Next, the rickety stairs to the basement were removed, and the brick walls were covered with cement to stabilize them.

IMG_3342

IMG_4037

Then, the floors of the first level were removed, as well as the cement steps leading up to the porch.  The brick foundation wall below the lower porch was knocked down, and then rebuilt, using some new bricks and some old from our brick pile.

IMG_4109

IMG_4108

So what does it look like now?  Have a peek!

WP_20130929_014

WP_20130929_024

A little better, right?  We have brand new, fully treated tongue and groove floor boards, and brand new safe, sturdy steps to the basement.

Do you remember how awful the soffits were looking back here?

IMG_3918

IMG_4031

Check them out now!

WP_20130929_0121

It makes a HUGE difference!  When I saw it for the first time, my jaw dropped.  I didn’t think they would ever look that good!  Also, I didn’t think I would ever get so excited about new soffits!  Amazing how your perspective changes with a project like this.

Right now, the upper porch is in the process of getting the same treatment.  The floors have been removed, and now a small portion has been replaced.  The rest will be replaced with matching tongue and groove boards this week.

WP_20130929_029

WP_20130929_026

It really is a huge transformation.  Everything is coming together!!  Look for updates later this week on our progress on the roof and gutters.

Don’t forget to check out The Remedy House sale tonight!  Lots of goodies coming your way! :)

Keeping Our Guests Clean

The bathroom in the back of the house just off the office will be the main guest bathroom for overnight guests.  We are going for a very classic look, with some upgrades for comfort.

Here’s what the bathroom looked like before:

IMG_2581

IMG_2590

And then the corner sink and wall were ripped out, and the exterior door was closed up:

IMG_3562

IMG_3566

And now, the tub and toilet have also been removed, and the vinyl floor has been pulled up:

IMG_3993

IMG_3995

IMG_3998

So basically, it’s just an open room right now.  Can you tell where the tub sat on the floor in this photo? ;)

IMG_3997

Now that we are basically down to a blank slate, this is the layout we are going for:

guest bath jpeg1 IMG_39951

IMG_39961

IMG_39941

Picture this…the entire bathroom floor will be tiled in some sort of black and white pattern.  The gray line on the right in the floorplan above indicates a “curb” that we will be adding to the floor.  It will be about 1-2 inches tall and will help to keep water from running all over the bathroom.  A clawfoot tub will be converted into a shower, and that side of the bathroom will include tile on the walls as well.  We were hoping to use the pedestal tub that was already in there, but realized that water can easily get trapped under the base and cause mold and mildew.  So a raised clawfoot is better.  We will also be using the 1926 pedestal sink I picked up a few months ago.

We will hang a tension rod from wall to wall in front of the shower to hold the liner and shower curtain.   There will also be a drain in the floor under the tub.

All in all, it’s a pretty simple set up and shouldn’t be too complicated.

For flooring, I prefer a simple black and white tile.  Here are some of my favorites:

99b209a9f4e0d460a36fa81ec4eb8ec7

00b291df9534d91c5be1af8c92c3b888

fca622e15561b52149a598dfa45f3834

For the wall tile around the shower, I think we will just go with simple white subway tile.  It always looks clean and classic.

12157006f25f570891291829b79a7985

f89bb9cd4fc8ca8e2011ce0b28785c7f

So what do you think?  Would you like to be a guest here?

Photo sources: 1, 2, 3, 4, 5


Getting Colorful

A while back, I picked out some color choices for the interior of the house.  As I’m sure you can guess, I’m a total amateur when it comes to paint, so I just pointed to pretty colors–after narrowing down the general color family I was going for.  But since we’ve decided to do a paint and primer in one instead of just tinting basic primer, the colors ended up being much more bold than we wanted.

Imagine my surprise when I went over to the house one night last week to discover a cotton-candy-pink living room!!  Yikes!  It was way too pink, even for me.  So we kind of had to go back to the drawing board, and since this task landed on the day of my surgery last week, it pretty much all fell on Charles.  But he did a fantastic job of sticking with the color families we had decided on for each room, but finding much lighter colors.

[Quick side note: who names these colors?!?! Some of them are so corny–um…Moment of Promise? I have wanted to be the person who came up with nail polish names for a long time, because they’re always so fun.  Maybe I should dabble in paint naming as well!]

By the way, they redid our formal living room in a beautiful barely blush color called Moment of Promise.  It’s really pretty, and looks fabulous with the ornate white fireplace!

IMG_4069

IMG_4070

My parents came in town for a post-op visit on Sunday, and my dad somehow got roped into painting color swatches on the walls with Charles.  (Actually, he says that he loves to paint, so I didn’t feel too terrible!)  After they painted for a while, Mom and I headed over to the house for my “first big outing” and to check out the colors.  Here’s what we’ve landed on so far…

Because our painter likes to work with the local Glidden store, and because we really had no preference, we decided to stick with Glidden for both our interior and exterior colors.  We still are undecided on a few rooms (dining room, kitchen, butler’s pantry, laundry room, master bath), but these cover most of the house.

All trim, for now, will be pure white.  We’d love to get down to the original wood trim, but that’s really just not feasible, so we thought white would help the house to look fresh and airy.

Kitten White- This is our main “off-white” that will be used throughout the house.  It’s a good mixed between gray and taupe…and color that we dubbed “graupe.”  (Doesn’t sound molestor-ish at all, right?)

kitten white

Kitten white will go in the foyer, stairwell, downstairs side entry hall, and upstairs main hall.  Since almost all rooms are connected to these areas, we wanted to go with a very neutral color that will go nicely with the other colors we’ve chosen.

IMG_40661

Wilton Blue– This beautiful gray-blue is the perfect mix of airy and cozy for the family room/den.  It has enough blue in it to not be too dark and dreary, and enough gray to not be too bright.  As the main room to watch tv and hang out with friends, we wanted this room to be comfortable and inviting.

wilton blue

IMG_4073

Snowbell– This calm, serene color will be used in our master bedroom.  It’s a lovely pale blue (NOT Carolina blue!!!), with a hint of lavender.  I love it because there are so many bedding and rug options to go with it!  We also plan to use this color with some white tile and cabinetry in the downstairs bathroom off of the den.  It complements the Wilton Blue perfectly!

snowbell

We are still trying to decide if we want to continue this color into the master bathroom and closet.  I think that we should leave the closet white so our clothes don’t end up looking different in the closet than they do outside of it.  What do you think?

IMG_4093

Fresh Cut– We got this color to try out in the dining room.  The room was painted green before, and the tiles in the fireplace are green, so we just wanted to see how that would look.  Green may look fine, but this color was way too minty for our taste.  We think something a little darker with some more gray in it might work better.  But when we put it in the upstairs guest bedroom, it looked perfect! That room gets a ton of sunlight, and the green just looked so natural in there.  So we are going to keep it for that room.

fresh cut

We are still very torn on the dining room.  Still thinking about wallpaper for the upper half of the room (above the chair rail), but that will have to come later, after we get a feel for what will look best in there.

IMG_4079

IMG_4087

Artic Night– We decided on this for the office.  As you know, we want a dark, masculine office with lots of leather and wood.  I was leaning more towards a dark teal, and Charles more towards a hunter green, so we met in the middle with this navy and I think it’s better than any other color we could have chosen!  I’m in love!

artic night

You can also see into the master bedroom from the office, and we think that the Artic Night and Snowbell will really go well together.

IMG_4091

Del Mar Shores– We haven’t actually settled on this yet.  We originally picked out a very light coral color for the second guest bedroom, but it turned out to be a lot darker than we had hoped, and just looked like salmon.  And not in a good way!  So we unanimously nixed that real quick.  Although I have never been a fan of yellow, it seemed that a house of this era could stand to have just a hint of yellow somewhere.

del mar shores

So we have picked out Del Mar Shores for that bedroom, since it isn’t overwhelmingly yellow.  Hopefully we can get a swatch up this week and decide on that for sure.

Alright let’s hear it…what do you think?  (Keep in mind that the pictures don’t necessarily do the colors justice, and they often look very different depending on the light!)

All color pictures are from My Perfect Color.

A Heavenly En Suite

If you’ve been following along, you know that we are planning to turn the old apartment kitchenette and pantry into a master en suite.  It is incredibly rare to find a closet larger than 2′ x 3′ in an old house, much less a walk in!  And you can forget about a large, luxurious bathroom.  Older homes just weren’t built to accommodate what we consider “must haves” today.  We’re so spoiled!  But lucky for us, the back half of the upstairs was turned into an apartment some time ago, leaving us with a large “kitchenette” that is no longer needed.  Which means, with a little imagination, we can create our dream master en suite!!

IMG_3891

IMG_3892

IMG_3889

Here’s the general layout now.  For your reference, the kitchenette is about 15′ x 13′, the pantry and closet area in total is about 15′ x 8′, and the bedroom is about 15′ x 15’8″.

Before JPEG1

Here’s the plan… we will knock out the pantry and master closet walls, creating one large space in between the bedroom and bathroom.  However, we will leave the right wall of the current master closet and insert a pocket door to save space.  We considered leaving this room open, but we thought it would be nice to be able to shut that room off if for some reason we have guests up there and it’s super messy!

You can see how large this area is, thanks to my fabulous model (he’s 6 feet tall).

IMG_4012

IMG_4015

Then we will wall in where the pantry door and master closet door are currently.  By doing this, we will basically have a closet that is about 10′ x 8′.

IMG_4017

IMG_4008

We are still playing around with several layout ideas for the bathroom, but we know we want a double vanity, large tile shower (preferably with two shower heads and a bench), the pedestal tub from the current guest bathroom, and a separate water closet for the toilet.  The chimney in the middle of the far wall can make things a little awkward, but by closing up the pantry door, we create a long wall there, so it’s workable.  There are lots of options, we just have to decide which one works best for us.  More on that later.

Anyway, here’s a basic layout of what we’re going for:

After JPEG1

While we’re still figuring out the bathroom layout, I’ve pretty much narrowed down my favorite ideas for the closet (of course…I’m a girl with way too many clothes and shoes).  I would like there to be plenty of hanging room, because Charles and I both would prefer to hang up most things; but I’d also like to incorporate some drawers, as well as shoe and jewelry storage.  Here’s what I like best about a few closets I’ve seen lately.

Ok, this is pretty much perfect.  I love the elegant white built-ins, with plenty of hanging space, but also lots of drawer storage.  I love that there are cubbies above for bags.  This one is especially appealing to me because we also have a full-size window at the very back of the closet (I didn’t include it in the floorplans above).

db797d547a8e06b63635a423b3fad3ff

I love this one sort of for the same reasons.  The glass doors make it look even more resplendent.  I’m also in love with the valet bars for displaying outfits and the lighting with drum shades.

39201b25af6610084d7ebd0f9a5efb3f

Being able to close cabinet doors like this helps to keep everything looking neat and tidy.

a36fe306bc0056392d912f953a098093

I’d love to do a lacquer dresser like this under the window for delicates and jewelry.  So glamorous!

fac4786b5fd5bc20561816aa7c3feaab

I could go on and on.  If you’d like to see more ideas that I love, feel free to browse my Master Suite Pinterest board!

Hit the Bricks

If you follow me on Instagram, you know that we are amassing quite a heap of bricks.

photo

Charles and I agree that we don’t really like the commercial grade sidewalk leading up to the house now, and would rather do a more attractive path.  Since we have so many bricks, we thought it would be cool to use them for a sidewalk.  I especially love these:

TDH715009.jpg.rendition.largest

cd1e7b27bca2a728a256ab8868cbaa87 {1,2}

And here’s where we’re a little undecided.  We have an absolutely fabulous mason who has done a beautiful job with our cheek walls so far.  (We just learned that’s what they’re called…we’ve been calling them the “porch arms.”  We keep it sophisticated around here.)  He is using cinder blocks to stabilize the inside, and then laying new bricks on the outside.  The curves are just perfect.  He really is an artist.

IMG_3931

IMG_3934

IMG_3935

Now that we have such beautiful brick work, we can’t decide if we want to paint the brick white to match the brick columns and foundation of the house, or leave it unpainted as sort of a feature.  We plan to add a brick face to the concrete steps, and will most likely treat them the same way as the cheek walls.  The path from the street will be unpainted brick.  So what do we do?  Paint the walls white, or leave them alone?   What about the steps?  Opinions needed, please!!

IMG_3929

IMG_3926